How to Upgrade the Suspension System on Your Toyota 4Runner – The Toyota 4Runner, known for its rugged reliability and off-road capabilities, can be further enhanced with a suspension upgrade. Whether you’re tackling challenging trails, improving on-road handling, or simply boosting the vehicle’s aesthetic appeal, upgrading your 4Runner’s suspension is a significant modification that can dramatically alter its performance and character. This comprehensive guide will walk you through the process, covering everything from choosing the right components to the installation itself.

Source: 4rstatic.net
We’ll delve into various suspension types, addressing common concerns and providing valuable tips for a successful upgrade.
Understanding Your 4Runner’s Suspension System
Before diving into the upgrade process, it’s crucial to understand the fundamentals of your 4Runner’s suspension. Most 4Runners utilize an independent front suspension (IFS) and a solid rear axle. The IFS typically consists of control arms, coil springs, struts, and various bushings. The rear suspension, depending on the model year and trim level, might employ leaf springs or a coil spring setup with a solid axle.
Understanding these components is vital for selecting the appropriate upgrade parts.
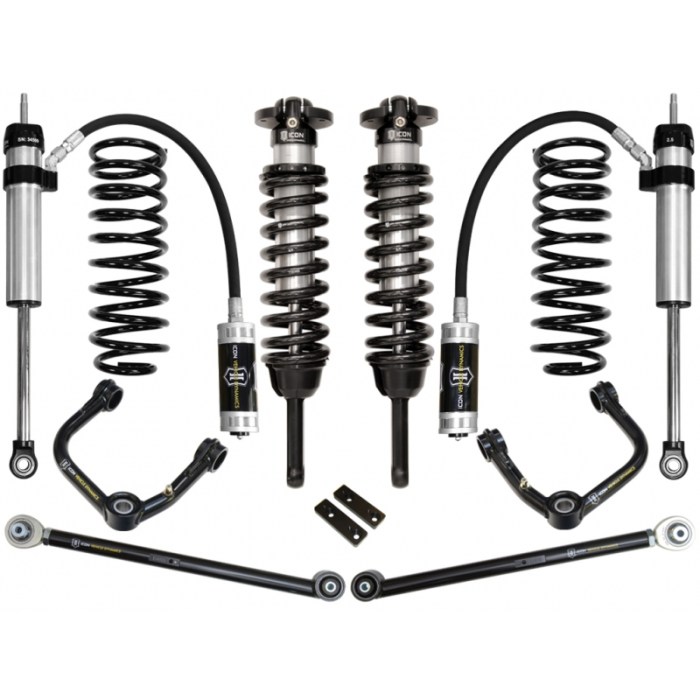
Key Suspension Components and Their Functions:
- Struts/Shocks: These dampen the up and down motion of the suspension, controlling rebound and preventing excessive bouncing.
- Coils/Leaf Springs: These provide the primary support for the vehicle’s weight and determine ride height.
- Control Arms: These connect the wheels to the chassis, controlling suspension geometry and wheel movement.
- Bushings: These are rubber components that absorb vibrations and allow for smooth articulation of suspension parts.
- Sway Bars (Anti-Roll Bars): These reduce body roll during cornering.
Choosing the Right Suspension Upgrade for Your Needs: How To Upgrade The Suspension System On Your Toyota 4Runner
The ideal suspension upgrade depends heavily on your intended use. Are you primarily focused on off-road performance, improved on-road handling, or a balance of both? Different upgrades cater to specific needs:
Types of Suspension Upgrades:
- Leveling Kits: These relatively simple upgrades raise the front end to match the rear, improving stance and ground clearance. They typically involve spacer lifts or replacement coils. Popular choices include ReadyLift and Daystar leveling kits.
- Lift Kits: These provide a significant increase in ground clearance, enhancing off-road capability. Lift kits range from budget-friendly options using spacer lifts and new shocks to more complex systems involving new control arms, longer shocks, and potentially even upgraded axles. Brands like Old Man Emu (OME), Icon Vehicle Dynamics, and Fox offer high-quality lift kits.
- Performance Shocks and Struts: Upgrading to performance shocks and struts improves handling, ride comfort, and damping control. Consider brands like Bilstein, King, and Rancho, each offering various shock options tailored to different driving styles and terrains.
- Coilovers: These combine the functions of a shock and coil spring into a single unit, offering precise adjustability for ride height and damping. Coilovers provide superior control and customization but are generally more expensive.
Installing Your Upgraded Suspension System
Installing a suspension upgrade can range from a straightforward process (like installing a leveling kit) to a complex undertaking requiring specialized tools and mechanical expertise (like installing a full lift kit with long travel suspension). Always consult your chosen lift kit’s instructions for precise details.
General Steps for Suspension Installation (Consult your specific kit’s instructions):, How to Upgrade the Suspension System on Your Toyota 4Runner
- Gather Tools and Parts: Ensure you have all the necessary tools, including jack stands, wrenches, sockets, torque wrench, and any specialized tools required by your specific kit.
- Safely Secure the Vehicle: Use jack stands to securely lift and support the vehicle. Never work under a vehicle supported only by a jack.
- Disconnect Components: Carefully disconnect the old suspension components, taking photos and notes as needed to aid reassembly.
- Install New Components: Install the new suspension components, following the manufacturer’s instructions meticulously.
- Torque Specifications: Use a torque wrench to tighten all bolts to the manufacturer’s specified torque settings. This is crucial for safety and proper suspension function.
- Alignment: After installation, it’s essential to get a wheel alignment to ensure proper tire wear and handling. An improperly aligned vehicle can lead to premature tire wear and potentially unsafe handling characteristics.
Frequently Asked Questions (FAQs)
- Q: How much does a 4Runner suspension upgrade cost? A: Costs vary widely depending on the type of upgrade and the components chosen. A simple leveling kit might cost a few hundred dollars, while a comprehensive lift kit with high-performance shocks could cost several thousand.
- Q: Will a suspension lift affect my 4Runner’s warranty? A: Modifying your vehicle’s suspension can potentially void certain aspects of your warranty, especially if the modification causes damage to other components. Consult your dealership or refer to your warranty documentation for specific details.
- Q: Do I need to re-gear my axles after a lift? A: Depending on the height of the lift, you may need to re-gear your axles to maintain optimal performance and prevent strain on the drivetrain. This is especially true for larger lift kits (3 inches or more).
- Q: What is the best suspension setup for off-roading? A: The best setup depends on the type of off-roading you do. For rock crawling, a long-travel suspension with high-clearance components is ideal. For high-speed desert running, a setup focused on damping control and stability is preferred.
- Q: Can I install a suspension lift myself? A: While some simpler upgrades can be done at home, more complex lift kits often require specialized tools and mechanical expertise. If you lack experience, it’s best to consult a professional mechanic.
Resources
- 4Runner.org Forum (A valuable resource for 4Runner owners and enthusiasts)
- Toyota Official Website (For vehicle specifications and warranty information)
- Bilstein Shocks (A reputable manufacturer of performance shocks and struts)
- Icon Vehicle Dynamics (A leading manufacturer of high-performance suspension components)
Call to Action
Ready to take your Toyota 4Runner’s off-road capabilities and handling to the next level? Start researching the right suspension upgrade for your needs and budget today! Remember to always prioritize safety and consult a professional if you’re unsure about any aspect of the installation process.
User Queries
What tools will I need for a suspension upgrade?
You’ll likely need a jack, jack stands, wrenches (various sizes), sockets, a torque wrench, and possibly a compressor for air tools. Specific tools will depend on the components you’re installing.
Do I need to realign my wheels after a suspension lift?
Yes, a wheel alignment is almost always necessary after a suspension lift to ensure proper tire wear and safe handling.
What is the difference between a lift kit and individual component upgrades?
A lift kit provides a complete system for raising your vehicle’s height, while individual component upgrades (like new shocks) allow for more tailored modifications based on specific needs.
How much will a suspension upgrade cost?
Source: alternativeoffroad.com
Costs vary widely depending on the components chosen, from a few hundred dollars for basic upgrades to several thousand for extensive lift kits and high-performance parts.